
The Very Least You Need To Know To Play Guitar
If you are like hundreds of other people who want to learn how to play the guitar, then you want to get right to it. You don’t want to spend a lot of time playing one string at a time. It is so boring when you learn in that manner that it can be difficult to stay motivated to pick up your guitar. Although, that method is great in theory, people want to pick up the guitar and start playing songs, as soon as possible.
This guide is intended to teach you enough to get you playing some songs and having fun with it. Once you get more comfortable with your playing and become more dexterous, you will want to learn more.
This post contains affiliate links, please read my full disclosure here. I only recommend products that I myself use or would use.
Developing a good practice routine will help you to progress quickly, as well as keeping you inspired to want to learn more. The hardest part can sometimes be just getting started.
This guide should get you playing a few songs within two months of practicing every other day for about 30 minutes per session; however, you can go at your own pace. One thing to keep in mind is that playing the guitar should be fun. It may get frustrating at times, but stick with it and it won’t be long until you are playing like a pro and seeking out more advanced courses and techniques.
Table of Contents
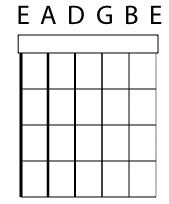
The Parts of the Guitar
Before you start playing you will need to know the different parts of the guitar.
 Familiarize yourself with the parts of the guitar, in order to follow along and understand the terminology in this guide.
- Tuning Pegs -There are six tuning pegs on a six-string guitar. Each tuning peg has a guitar string wrapped around it. When you turn the pegs, either in a clockwise or counter-clockwise direction, it will loosen or tighten the strings, changing the tone.
- Nut -The nut holds the strings up off the neck and frets. Every guitar must have a nut (and that doesn’t mean the player).
- Neck -The neck is the area where the frets are and where you are pressing the strings to make the notes. You should never lean your guitar on its neck, otherwise, the neck will begin to bow or warp because of the added stress on it.
- Body -The body is attached to the neck and this is where the sound is produced from a hollow body or where the pick-ups and electronics go on an electric guitar.
- Pick guard -This is a piece of plastic that is added to the guitar body, in order to protect it from any damage that could be caused by strumming.
- Bridge -This is where the strings are inserted and it keeps the strings lifted off of the guitar. The bridge has to be properly placed, in order for the guitar to stay in tune.
- Fret – this is the area that you place your fingers to make notes. You should never place your fingers directly on the metal frets. Always place your fingers
between the metal frets, otherwise, the string will not ring out and a buzzing sound can occur.
The Very Basics
Illustrated below are the notes on the six strings with the 6th string being the thickest string as you are looking down. This tone will be referred to as an E.
The 5th string is an A. When you pluck it, this tone is called an A.
The 4th string is a D.
The 3rd string is a G.
The 2nd string is a B.
The 1st string is an E. The tone of both the 6th string and the 1st string are exactly the same. The difference is in the octave. One string has a higher pitch than the other but the “tone” is still the same.
There are only 7 major notes on a guitar and they are very easy to remember. Just like the alphabet, they are the first 7 letters. A, B, C, D, E, F, G. The entire neck of the guitar is based on these 7 notes. When you keep it simple and think of it in these terms, it is not as overwhelming.
Practice strumming each string, while saying the string name out loud. You should do this until you have each string memorized.
Although you are probably eager to get started, you should take the time to practice these little things each day. You may want to dive right in and learn to play songs, but your guitar playing will develop much quicker, if you take the time to learn the basics first.
The Pick
 There are different thicknesses of picks, which will affect the sound of your playing. There are heavy, medium and thin picks. Make sure that you buy a couple of each size and styles so that you can determine what size and style that you prefer.
When you are first starting, you need to have plenty of these on hand. You will be surprised at how often you end up losing your pick.
Picks or plectrums, as they are sometimes referred to, come in all different colors and are made of different materials. There are even finger picks that slip on like a ring at the tips of your fingers.
Everyone has their own preference and you just need to try out different picks until you find one that suits your playing style. Beginners may find it best to use a medium or heavy pick. My favorite pick is a Fender Heavy. I hate thin picks that don’t pull the tone out of the strings.
I always use 10s or above for strings. I can’t go too heavy on the strings or I can’t use my hand after I’m done playing. I do like Elixir Strings and I use 10s for acoustics and 11s for electric. But when desperate, I’ll use any string that will work.
Holding the Pick

The pick is held in your strumming hand. You should hold the pick so that half of the pick is held between your finger and your thumb. Hold about half of the pick and let the other half exposed. It can be best to use your pinkie finger to anchor your hand below the bridge.
Remember to keep your fingernails trim on the hand that will be pressing down the strings. You will be more in control of the strings.
Sit comfortably, with the guitar body resting on your right knee if you are right-handed.
RELAX and begin practicing. Relaxing is something you must learn to do when you practice and play. Be mindful of your fingers and arm tensing as you practice and relax your hand.
Tuning Your Guitar
Things get a little harder here. I know that I used to have problems when I first started trying to tune by ear. I would get other guitar players to tune it for me and then I would try to keep it in tune with itself.
Using A Tuner

It’s best to use a guitar tuner to tune your guitar. I’ve always used a Korg chromatic tuner. I find them to be inexpensive but easy to use.
If you have a tuner and you are using an acoustic guitar, pluck the E string. There should be a needle on your tuner that indicates when it is in tune.
The tuner should also indicate the note. For instance, if the string that you were checking is wound too tight, the needle may indicate that it’s in tune, however, the note may be an F, instead of an E.
Tuning By Ear
When you are learning how to tune a guitar by ear, it can be frustrating, but you should learn how to do this eventually. You can tune the guitar to itself or use a particular tone as a reference, for example, a song or your voice. If you want to play along with recordings, many songs are in standard tuning, therefore, that is how your guitar must be tuned.
If you are just tuning the guitar to itself, strum the E string. It is best to use a reference note, using a pitch pipe or a piano. Make sure that the tone is not too low and the string is not vibrating too much or causing a buzzing sound.
You should also be sure that it’s not too high, since that will cause too much tension on the neck. Match the tones and be sure that the string feels good on your fingertips when you fret.
When you tune a guitar by ear, you usually start with the E string, which is the fattest string on the top.
Now, press the E string on the 5th fret and strum that string and then strum the 5th string, right below it. You need to get the tones to match by turning the tuning peg for the 5th string.
When these two strings have the same tone, press the 5th string on the 5th fret and match the open 4th string to it.
When the tone matches, press the 4th string, 5th fret and strum the 3rd string and match those two strings.
When the 3rd string matches the 4th string, you press the 3rd string, 4th fret (instead of the 5th fret, like all the others) and then, strum the 2nd string until the tone matches.
The 2nd string will be pushed down on the 5th string and the 6th string strummed and the turning pegs turned, until the tone matches.
Wow! That’s a lot to take in and it probably sounds awfully confusing, but if you just follow the directions, it will fall into place.
Sitting Correctly

To really help your playing improve, make sure that you are using the correct posture. You want to be comfortable when you are playing and you want your playing to improve as quickly as possible. Many people tend to overlook this important part of learning how to play.
Regardless of whether you are sitting or standing, your back should be straight and your hand should be placed that will give you the greatest reach of the frets. If you are sitting down, be sure that your guitar is resting on your right thigh. If you are standing, the best position for your guitar is to adjust the strap so that your guitar is just above or parallel to the waistline.

Be sure that you are arching your hand properly and holding your thumb behind the neck. If your hand is big enough, you can even wrap your thumb entirely around the neck and use it to play the low E string. Just be sure that you are holding your hand in a position that is comfortable for you and that you are not slouching, otherwise, you will get tired out way too quickly.
Many people focus more on what they look like when they are playing, instead of how they sound. When you are playing to the best of your ability, no one really cares how you look as you’re playing. Just look at any video of a great guitar player.
If a guitar player sounds good, it doesn’t matter what he or she looks like. In fact, if a guitar player is really good, the way that player looks as he or she is playing starts being copied.
The First Three Chords
To get started quickly, you will need to learn the most common chords on the guitar. The first three that you should learn are the G chord, the C chord and the D chord. They probably won’t sound very good at first and it will take some time for you to change chords.
Just keep changing from chord to chord. If you are watching television, grab your guitar and just practice fingering each chord. You don’t even have to strum. Just get used to moving from one chord to another.
G Chord

The numbers on the dots are indicators of which finger you will use to push down the string. The line at the top represents the nut of the guitar and the circles show you that you strum the strings adjacent to them, along with the strings that you are fingering.
First finger goes on the 2nd fret, 5th string. The second finger goes on the 3rd fret, 6th string and the third finger will go on the 3rd fret, 1st string. You will strum all six strings.
C Chord
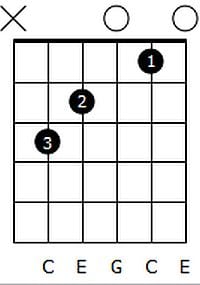
Place your first finger on the 1st fret, 2nd string, the second finger on the 2nd fret, 4th string and the third finger should go on the 3rd fret, 5th string. The X means that you will not strum the 6th string at all.
D Chord

Your first finger should be placed on the 3rd string, 2nd fret. Your third finger will be placed on the 2nd string, 3rd fret and the second finger goes on the 1st string, 2nd fret. Do not strum or pick the 5th and 6th strings.
It will be slow going at first, but you need to practice these chords as much as possible. As you play, you will notice that the tips of the fingers on the fretting hand are becoming tender.
Eventually, you will begin to develop calluses on your fingertips. Don’t overdo it at first and when it starts hurting too much, stop playing and give your fingertips a break. You can soak your fingers in salt water to help develop those calluses more quickly.
With about two weeks, your muscle memory and dexterity will begin to improve. You will be changing chords without missing a beat.
To check out the best first guitar chords for beginners, click here to check out this article that goes over learning to play the chords
This is when guitar playing becomes a lot of fun. We will begin learning how to strum and exploring strumming techniques next.
Strumming The Guitar
Too often, guitar players focus more on their fretting hand and tend to ignore the strumming hand. The rhythm is controlled by the strumming patterns. This is what makes each song different. The same three or four chords are used in many songs, but strumming or picking the strings in a particular rhythm is what makes each song unique.
If you are playing an acoustic guitar, you should strum directly over the sound hole for most songs. On an electric guitar, you would play over the pick-ups. Strumming comes from the wrist and not the elbow. Your wrist should be loose and relaxed. You should not be moving your entire forearm. Keeping your hands relaxed is the key to playing fast.

You should practice with a metronome because this is an inexpensive tool will help you to learn to count. You can pick up a metronome at any music store or order one online. There are many different kinds but a clicking sound works best. Don’t forget to tap your foot along with the metronome. I like this particular metronome because it’s loud and you can use it anywhere.
Practice strumming only down and then, only up. After that, practice up and down strumming. As you continue practicing, you will begin to discover just how important your strumming is for sounding great. There are certain things that make you sound great and a good strumming technique is one of those things that separate the pros from the amateurs.

Here is some tablature that can show you just how to strum. The horizontal bracket symbol above the chord tablature represents a down stroke and the down arrow represents an up stroke. This is very basic strumming and as you progress, you will learn the most common strumming patterns. Start slowly and increase your speed as you go.

That’s really all you need to get started. With practice, you will soon be playing a few songs and hopefully, become inspired to learn even more. This is basically how I learned to play. There was no internet then. No YouTube to help me figure things out. I watched other people play and learned everything I could from other guitar players. This was a long tutorial but there is a learning curve involved.


