
Start Reading Guitar Tab To Improve Your Playing Even More
Guitar tablature is an easy way for guitarists and bassists to display how to play songs on the guitar or bass. When you first encounter guitar tablature or tab, it may look confusing, but it makes it much easier to learn how to play guitar.
Table of Contents
How To Read Guitar Tabs
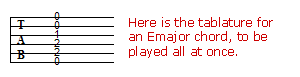
Each string is represented and then a number is written on the string, so you know which fret you push the string down on.

So you would push the string down on the 7th fret, 3rd string. This is a very easy way for guitarists to share their music with other guitarists. The only downside to this method is that it doesn’t indicate rhythm. If you have a recording of the song you are trying to learn, you can listen to the song to get the rhythm.
Here are a few more examples of tab:

These are just a few examples to get you started. Once you begin understanding this, tablature can display different techniques, as well. For instance, if you had to bend a note, it would look like this in tab:
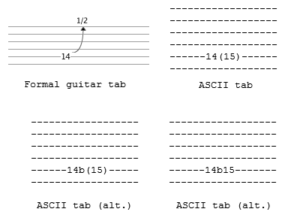
ASCII tabs are displayed on a lot of web pages. These are all the same bend, but these may be the various types of tablature that you may encounter.
Tablature is not the same as reading music. The only people who read tab are guitarists and bassists.
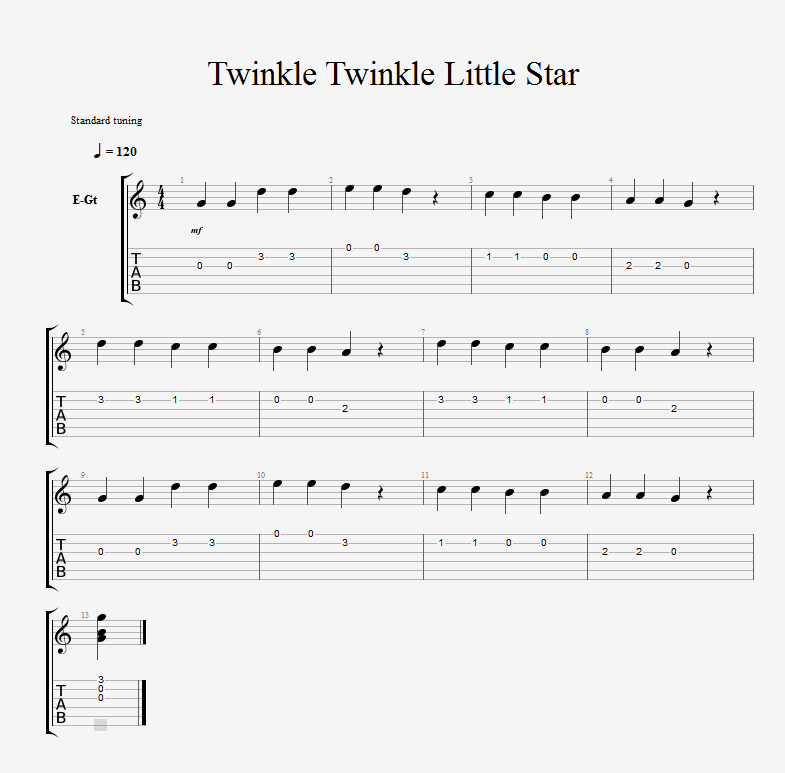
Here are a few examples that can help you to understand how to read tablature. Everyone should know the tune of Twinkle Twinkle Little Star and Mary Had A Little Lamb. Once you begin reading the tablature and then playing the notes, it will come together and you will understand this concept.

Even More Chords
If you are a complete beginner, you want to check out my article to learn to play the three most common chords for beginner guitar players by clicking here.
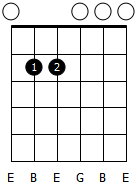
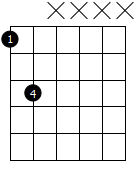
The next chords to begin learning are the E major, A major and B major. Continue practicing them until you can change quickly and the chord rings out clearly. It won’t be long now until you are putting these chords together and playing some of the most popular songs ever, all on your own!
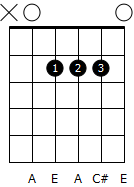
E Major Chord

A Major Chord
B Major Chord

Try some 12 bar blues
These 3 chords make up quite a few songs, especially, blues songs. Try this tab out:

Harder Chords
The Dreaded F Chord
Just about everyone who has ever tried to learn how to play the guitar has struggled with the F chord. It seems that this is the guitar chord that makes or breaks you when you are learning. This chord will probably cause you more frustration than anything else that you are trying to learn when you are first starting out.
By practicing until you get it right, your fingers will be learning how to be more dexterous in the process and getting this chord down will improve your strength and flexibility.

This is a great way to play the F chord if you do a lot of open chord strumming. Playing the F chord like this will make it easier for you to change chords when you are playing open chords.
Going from a C to an F is a very common chord change in songs and some songs just don’t sound as good if you are playing barre chords because there are no open strings ringing out.
Your First Minor Chords
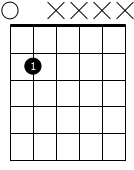
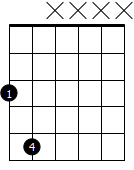
Every chord has a major and minor chord, but when you are first starting out, you should memorize the E minor and A minor chords.
E Minor Chord
A Minor Chord

The examples of the chords that you have been shown so far are only one way of playing these chords. There are different ways that you can play the same chord, but for beginners, these are the easiest ways to play them.
Continue to practice changing from chord to chord, in order to become more dexterous and so that you can memorize the chord shape and sound.
Practice your chords so that each string that is supposed to ring out, is clear and does not sound muffled.
You must start slow and be very precise. It is harder to unlearn bad habits and sloppy playing, so be sure to take your time, start slow and do it right the first time.
You will begin to discover which chords sound good with each other and as you pick up speed, you will begin hearing popular songs as you strum, which is the first step to learning how to play by ear.
Power Chords
Learning and playing power chords can get you started on the guitar pretty quickly. Power chords are two note chords and they are neither a major nor a minor chord, which means they can be used for just about any song.
This can be a shortcut for playing guitar quickly if you are playing with other guitar players or if you sing when you are playing. If you are playing power chords without any kind of accompaniment, it can sound awfully boring.
A power chord consists of the lowest two notes of a regular chord. Most power chords will consist of two or three strings. Although you may be playing on three strings, there are still only two notes, because you are playing the same note on two different strings.
Notes On 6th and 5th String
This is a good time to begin learning the notes on the 5th and 6th strings. Learning the notes on these two strings can give you a great head start to music theory.
The guitar consists of only 7 tones and these tones can also be sharp or flat. These tones are represented by letters and are called notes. These notes are:
A, B, C, D, E, F and G.
On each guitar string, there are either one or two frets between each tone or note:

The (I) represents one fret between each note and the (II) represent two frets between each note. Here is a diagram representing the six strings:

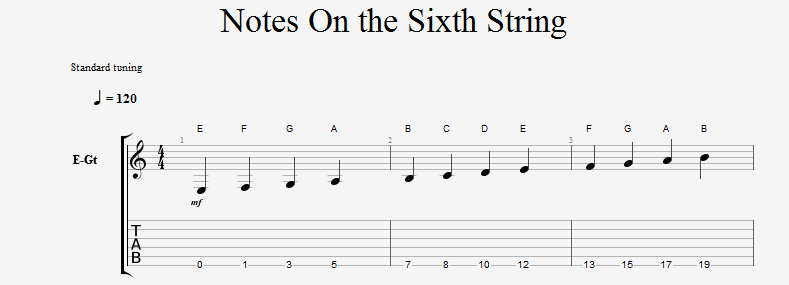
The sixth string is also known as the low E string. When you pluck the string without fretting any notes, this tone is called an E.
Since there is only one fret between an E and an F, you would press down on the first fret for an F note.
There are two frets between an F note and a G note, therefore, you would press down on the third fret to play a G note.
Between the G note and the A note, there are two frets, so to get an A note, you would press the string on the fifth fret.
Between the A and B note, there are two frets, so you would press the string on the seventh fret.
Between the B and C note, there is only one fret, so you would press the string on the eight fret.
Between the C and D note, there are two frets, so you press the string on the tenth fret.
Between the D and E note, there are two frets, so if you press the twelfth fret, you get an E and everything starts over again.
See how the tones are in alphabetical order?
Here is a representation of the notes on the fifth string:
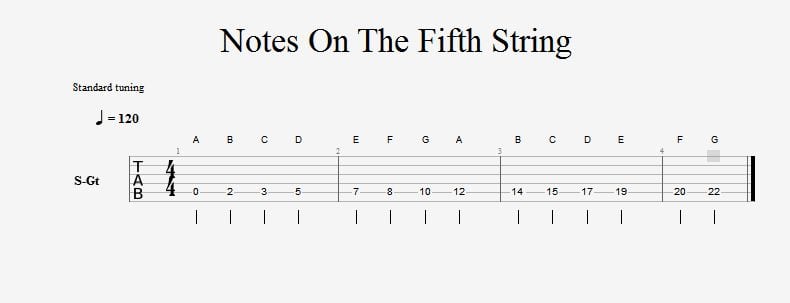
The fifth string played open, which means that the string is not plucked, is an A tone.
Between the A and B note, there are two frets, so you would press down on the second fret to play a B.
Between B and C, there is only one fret, so to play the C, you would press down on the third fret.
Between the C and D, there are two frets, so you would press the fifth fret to play an A.
You should start seeing a pattern here.
Here are the notes on the fourth string:
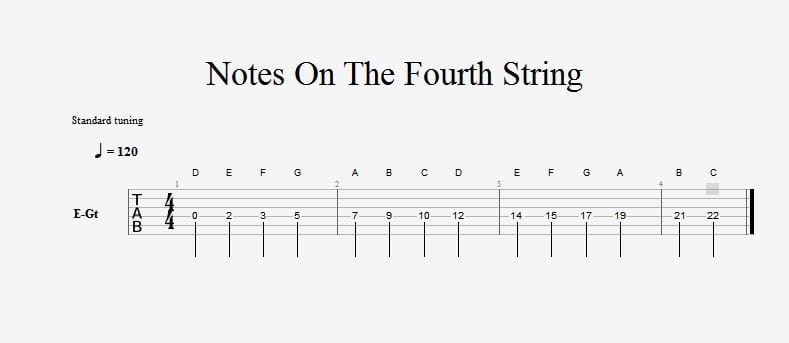
The fourth string is a D, so playing it open gives you a D tone. If you play the fourth string, second fret, you have an E tone, because there are two frets between the D and the E and so on.
Once you memorize the pattern, you can find any note on your guitar neck. Memorize one string at a time. As you play each note, say the note aloud.
To play a power chord, you play the root note, which is the name of chord and on the string below, play the fifth tone from the root.
For instance, if you want to play an E power chord on the fifth and sixth string, you would pluck the sixth string open and on the fifth string, you would press the string down on the 2nd fret (B note), because it is 5 tones from the E.
When you are playing power chords, the pattern is the same all over the neck. If the first string is open, it is slightly different.
Here are the power chords with the notes starting on the sixth string.
E Power Chord – Open Position
E Power Chord – 12th Fret

F Power Chord – 1st Fret
G Power Chord – 3rd Fret
A Power Chord – 5th Fret
B Power Chord – 7th Fret
C Power Chord – 8th Fret
D Power Chord – 10th Fret
As you can see it’s the same shape, you are just moving it up the neck.
Your fingers stay in the same position as you move down the neck. The note that you press on the sixth string is the name of the power chord.
Using this formula can also help you to figure out popular songs. You can find the chords of a song by playing power chords.
As you listen to the song, write down the tones that hear, in the order that you hear them.
Once you get the tones figured out, you can decide if they would sound better as open, full chords. Because a power chord is neither a major or minor chord, you will have decide which one it is, by trying each type in the chord progression.
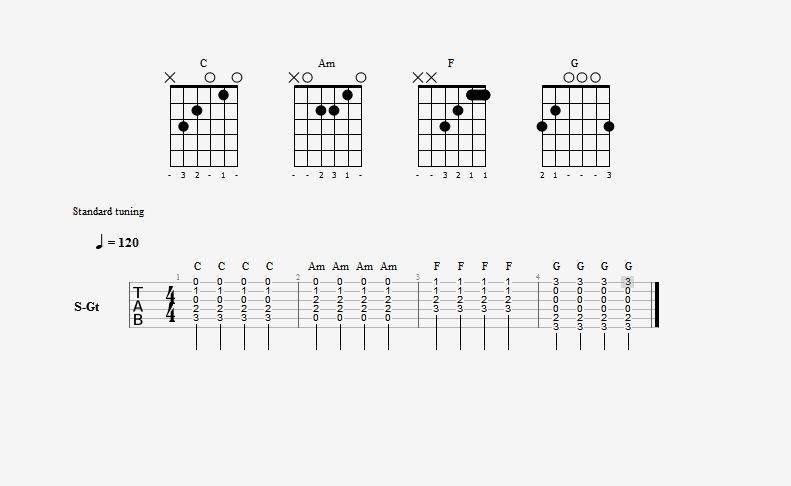
For example, if you trying to figure out a song and it had the chords, C, Am, F and G, you would figure it out with power chords and the chords would look like this:
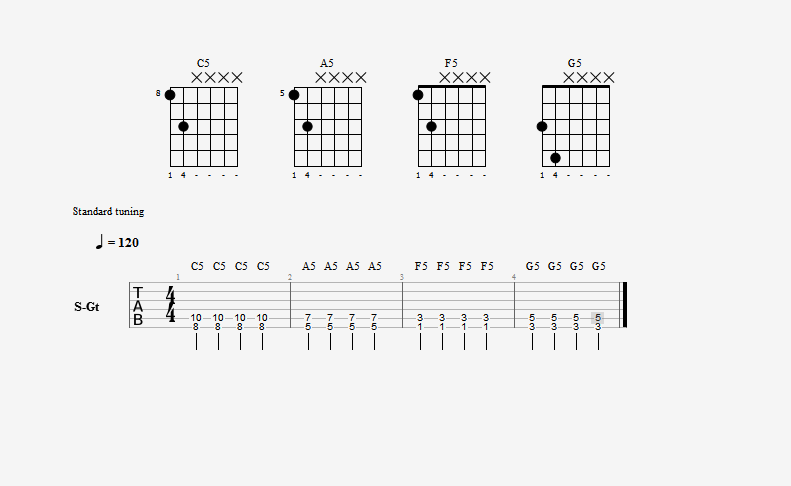
Now, in order to make the song sound fuller, you can play it like this using regular chords:
Many hard rock and heavy metal songs consist of power chords. You can get a heavier, bass sound that is just what a song needs in those types of songs.
If you are playing with another guitar player, one guitar player can play the open chords and the other player could play the power chords.
if you are playing heavy metal and hard rock, you are going to be using a lot of power chords with the bass on your amp turned way up.
You can also use power chords as a means to help you to figure out by ear any songs that you may want to learn.
Barre Chords
Now that you are familiar with power chords, the next step is to add a few fingers and make barre chords.
These chords are called barre chords because you place your first finger like a bar across the string.
It is important that you hold your first finger straight across the neck. Every string needs to be held down firmly so that every note rings out clear.
You need to hold the wrist straight, as well. You can do this by placing your thumb behind the neck about halfway down. Be sure that there is a space below the neck, between your first finger and thumb.
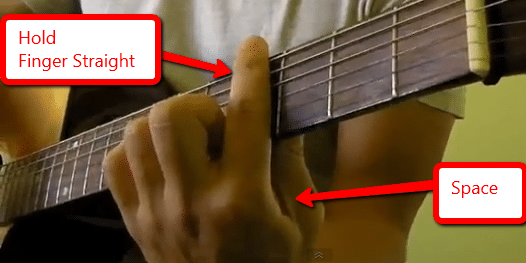
Be sure that you have that space below the neck. This gives you the leverage that you need to push the strings down across the neck, so that every note rings out clear and true.
You will use your other three fingers to make a chord shape.
There are two common chord shapes that you use for a barre chord.
One is an E major shape and the other is an A major shape.
The root note of the barre chord is the same as a power chord.
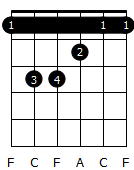
To make an F chord, you would barre your first finger across the first fret, your second finger would be on the 3rd string, 2nd fret, your third finger on the 4th string, 3rd fret and your fourth finger on the 5th string, 3rd fret.
F Barre Chord
Make sure that you practice until every single string rings out clear. Just be sure to press down properly and use your thumb for leverage. You won’t have to press down as hard, plus it relieves the tension in your arm.
You will use the sixth string to indicate the root note. You move it up the neck, just like you did with the power chords.
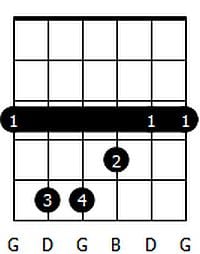
If you want to play a G major Barre chord, you just move up 2 frets to the 3rd fret and play it like this:
G Major Barre Chord
The pattern continues up the neck just like the power chords did. If you notice, the fifth and sixth strings make the power chord. You add the other strings to get the entire chord.
If you want to make an A barre chord, you move this pattern to the 5th fret.
To make the B barre chord, move this pattern to the 7th fret and a C barre chord will be on the 8th fret.
Here again is the pattern (and remember the distance between notes is the same on all strings, the difference is where it starts):
The next chord shape is the A chord. You barre your first finger across the top five strings and use your third finger to barre the 4th, 3rd and 2nd strings.
This chord shape may give you some problems as you try to only press the 4th, 3rd and 2nd string without pressing the 1st string.
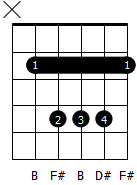
It will take a bit a practice, but like everything, that’s all it takes. The first major barre chord using this pattern is a B, which looks like this:
B Barre Chord
To make a C barre chord, you will move this pattern up one fret since there is only one fret between B and C.
C Barre Chord

Just like with the E major chord shape, you continue up the neck, following the same pattern.
If you want to play a D, you move the A barre chord up 2 frets to the 5th fret. To play an E, you play this shape on the 7th fret.
These two barre chord shapes will get you started playing just about any song that you want.
This should be enough to keep you busy for a while. We will be learning Scales next to help you to start playing some leads.


