
Pentatonic Scales And Beyond
Pentatonic scales are scales that are made up of five notes, thus the word, pentatonic, meaning five tones.
These tones can be seen on the guitar neck in a pattern.
When you first begin learning how to play lead guitar, you need to memorize a few scale patterns.
The same pattern can be played all over the neck and the key of the song will determine where you will play it on the neck.
Table of Contents
Minor Pentatonic Pattern

This pattern can be a minor or major pentatonic scale. The difference is the note after the scale pattern begins.
This is why you learned the notes on the 6th string. The note that you start this scale on will determine the key.
When you start this pattern on the 6th string, 5th fret, the scale would be a A minor pentatonic, because you started on the A note.
This is a minor pentatonic scale because it starts on the first note of the scale.
If you started playing this pattern on the 6th string, 8th fret, it would be a C minor pentatonic. It may seem confusing at first, but as you practice, everything will begin to fall into place.
Just for fun, listen to a song that you know is in the key of E and play this pattern on the 12th fret.

Keep practicing this pattern and learn it, so that you can play it in any key, anywhere on the neck of the guitar.
This is one of the basic scale patterns and as you progress, you will learn different techniques that will make your playing come alive, such as, bending and vibrato, but that is for another lesson.
Major Pentatonic Scale
Here is the pattern for a major pentatonic scale. If you look at the pattern, you will see that it is exactly the same pattern as the minor pentatonic.
The difference is the note after the root. In other words, if you are looking for the pattern for an A major pentatonic scale, you would start on the 5th fret and then the next note would be the F# on the 2nd fret
Look at the patterns in these two scales and you can see that the shapes are exactly the same.
This is just one pattern for the most common pentatonic scales. There are actually five patterns.


Major Or Minor Key
But now you may be asking how to tell the difference between the two. If a song starts in the key of A, with a minor chord played or if the song sounds bluesy, you should try the 5th fret first.
If that just doesn’t sound right, move down 4 frets and play the same pattern.
If you know a song is in the key of B, you might first try to play this scale on the 7th fret and if it doesn’t fit, you should just move down 4 frets and start the scale on the 4th fret.
When a song is more of a pop music type genre, it is usually a major scale.
When a song has that haunting, minor key sound or if it is a blues song, a minor scale is usually played.
Remember that when playing guitar, you can break the rules. As you progress in your playing and start to use your ears more, things will become more clear and you will be able to pick up notes and keys without all the effort.
Guitar Playing Techniques To Make Your Guitar Talk
When you play the guitar, you are trying to evoke an emotion in your listener, so that the listener will connect with the music.
You do this by telling a story with your guitar.
Just as a writer uses words to tell a story, a guitar player uses the notes on the guitar to tell a story.
A guitar player uses different techniques to get the message across in a way that keeps the listener involved and excited.
These techniques consists of string bending, hammer ons and pull offs, slides and phrasing.
Without these techniques, known as guitar articulation, the guitar would be very boring.
It takes practice to make your guitar talk, but learning these techniques will take your playing to the next level.
Think of someone telling you a story or sharing an experience with you, all the while, speaking in a monotone voice, never changing pitch to show any kind of emotion.
You would probably fall asleep in five minutes or your mind would start straying from the conversation and you would start thinking about where to go for dinner or something else that had nothing to do with the conversation.
Lead guitar mostly comes from learning scale patterns.
However, many new guitar players can’t figure out why their leads sound the same as when they practice these scales.
Every guitar player experiences this when they first memorize scale patterns.
The reason for this is because the guitar player doesn’t change the order that the notes are played and use no type of articulation to add variety or emotion to the lick.
When you are learning any scale and you are practicing it, it doesn’t sound like much.
Basically, the idea of practicing these patterns is to memorize where these notes are.
When you want to use a scale in a song, you will have to move things around a bit. You will also need to learn a few techniques that will allow you to express yourself and “talk” with your guitar.
We will go over some of the most common techniques, which will give you the musical voice that you want.
Slides
Sliding into a note gets you to the next note faster and puts some articulation into your playing.
Make sure that your finger is making contact with the fingerboard as you slide, so that you won’t lose the note.
You pluck the first note and slide into the next note without plucking the string again. It should not take you long to learn to do this.

You can slide up and down the neck and many guitar players use sliding as a way to get to the next pattern of notes that they want to play.
String Bends
One of the best ways to make your guitar “talk” is by bending the string.
You fret a note and then, push the string upward or bend it until it reaches the tone that you want.
You should use your first and second finger to help you to push the string up when possible.
You should, however, be using your arm and your wrist to push up the string.
Many new players use only their fingers to push up the string, but the movement should start in the arm.
The best thing to do is to lock your fingers, so that you are pushing up with your wrist and arm.
The best way to hear how far you should bend the note is to slide up to the note you want to reach with your bend, which is usually one or two frets. These are also known as half-steps or whole steps.
Sometimes, though, you will bend 1 and ½ steps, which would be three frets from the beginning note.
The note that you slide up to is the same note that you are trying to bend to.
Bending a string must be done properly, because a bend that doesn’t quite make it, sounds awful and it makes you sound like an amateur.
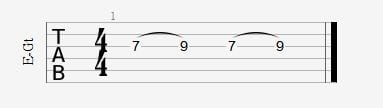
Here is a piece of tablature demonstrating the slide and then the bend:

Most guitar players will use their third finger for string bending and that is really the best finger to use.
The pinky is just too weak and can be hard to control. So it is absolutely fine to stretch across the frets and use your third finger for most of the bends.
Once in a great while, on the 1st and 2nd string, you need to use your fourth finger to do the bending.
Just be sure that you use your other three fingers to help you to reinforce the bend.
Getting the pinky strong enough to do bend is going to take some time, but using your other fingers to help push the string up, is the key to achieving this quickly and easily.
Below is the tablature for a bend on the 2nd string. Pluck the 2nd string, 5th fret with your first finger. Place all your fingers on the fretboard ending with your pinky on the 8th fret. Now pluck the 8th fret and bend the note up one whole tone using your arm and all your fingers to help push the string up.

Here is an example of what your fingers will look like on the guitar neck using your other fingers to reinforce the pinky bend:

When you are done bending the string, you should use your picking hand to mute the string. This way you can’t hear the string moving back down.
As you learn your scales, you will discover the best notes for bending. You will bend to a note that is within the scale.
Although you can bend the string 1 and ½ steps (3 frets), the best sounding bends are usually a full step (2 frets).
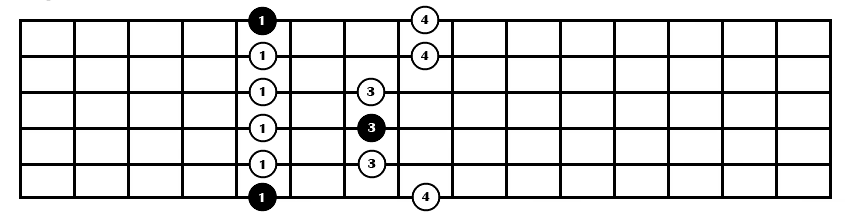
For instance, here is an illustration of the fifth position of the A minor pentatonic scale and shows the best bends:

On the 1st string, your pinky would be on the 8th fret and you would bend the note up to the D.
When you are on the low strings, you should always bend those strings down. If you bend the string up like the higher strings, the string would go off the edge of the guitar neck.
Bending can make your guitar playing come alive, but it will only sound good if you get to the correct note.
There is nothing that screams amateur as when a guitar player’s bend doesn’t reach the note that’s intended.
Listen to some of your favorite music and pay attention to the guitar player’s string bending to get an idea of how it should sound.
Hammer-ons and Pull-offs
Hammer-ons and pull-offs, which are also called, guitar slurs, are an easy technique to master.
Hammer-ons consist of plucking a note and then hammering your finger down on a higher fret. The string is only plucked once and two notes are produced.
Hammer-ons are represented in tablature like this:
Place your first finger on the 7th fret, 3rd string and pluck the string.
While the note is still ringing out, hammer your third finger down on the 9th fret, 3rd string.
You can practice hammer-ons by using the pentatonic scale and doing hammer-ons for the second note of each string.
Playing hammer-ons will help you to play faster and can liven up your sound.
Pull-offs are very similar to hammer-ons because you are plucking the string only once to get two tones.
A pull-off would consist of plucking the second note and lifting your finger to get to the lower note on the neck.

Vibrato
Vibrato is achieved when you shake the string to make the tone fluctuate.
There are different techniques for getting this sound and lead guitar playing would be awfully dull without it.
Vibrato is applied at the end of note and helps the note to sustain longer.
After fretting a note and then strumming it, you should bend the note ever so slightly, either up or down, and then bring it back to its original pitch. You do this in a fast, constant pattern.
You can use any finger to do vibrato, just remember that the movement starts in your arm and the wrist helps to move the hand.
Classical guitar players usually move the finger horizontally across the string, while remaining within the fret to give the note vibrato and to sustain it.
When you see vibrato written on tablature, it looks like this:

It is hard to explain vibrato in writing because vibrato is done more by the feel of a song.
The speed at which you will play the vibrato depends on the song and how far you raise the pitch is also determined by the feel of the song.
The main thing is to be sure to get the tone to the same pitch as you shake the string, otherwise, it will just sound out of tune.
These are just five of the most common types of techniques that will help your playing to become more colorful and expressive.
Practice these techniques until you get them right.
It may take a little more time to get them right, but in the end, it can save you time because your playing will begin to improve, instead of wasting years playing and never getting any better.
Many people can’t figure out why their playing never improves and the main reason is because they didn’t take the time in the beginning to learn these techniques correctly and their muscle memory has learned the wrong movements.
Too often, guitar players have to unlearn their bad habits and find that they have wasted so much time by being in a hurry to jump ahead.
It takes more time to unlearn something, in order to do it right, than it does just to do it right in the first place.


